

The bathroom is every homeowner’s personal sanctuary. It’s where our most private business is taken care of on a regular basis. That’s why there’s no worse feeling than finding out something is wrong with your bathroom toilet. Fortunately, a lot of toilet issues are easy to solve. If your problem revolves around leakage a the base of your toilet, you’re in luck! Repairing the issue is fairly easy to tackle without the help of a professional, and it’s also an inexpensive fix. Here’s how:
Tools and Materials Required:
- Adjustable wrenches
- Mineral Oil
- Plumbers Tape
- Rags
- Replacement Toilet Mounting Bolts
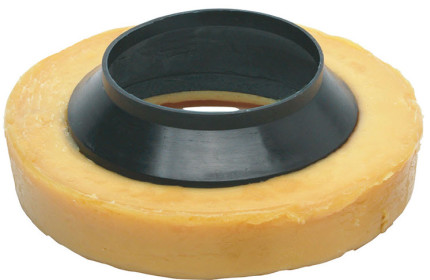
- Replacement Wax Ring
- Toilet Plunger
- Putty Knife
- Waterproof Gloves
What to know before you begin installing a new wax ring:
- Whether you’re replacing a toilet, moving a toilet, or repairing a toilet, a new wax ring needs to be put in. A wax ring cannot be reused, as it will not maintain a waterproof seal if this is attempted.
- If installed correctly, a toilet wax ring can maintain a waterproof seal for years that is resistant to bacteria, black mold, and other fungi.
- Before replacing the wax ring on your toilet, wiggle your toilet and check if it is rocking slightly from side to side. If it wobbles enough to raise any edge of it off the ground at all, it is likely that toilet anchor flange is to blame and will need to be fixed as well. You can purchase a repair kit from your local hardware store for very little money.
- If you have recently replaced your bathroom floor with a thicker covering, such as vinyl flooring to tile, it can create a gap between your toilet and its anchor. If this happens, a flange spacer is an excellent solution.
Now, let’s go over how to actually install a new wax ring. The first step is to drain the toilet, which is easy enough if you follow these six steps:
- Turn the water off that is connected to your toilet. If it’s a modern model, there will be a supply line valve located on the back of the toilet. However, if it’s an older model you may need to turn off the water to the room or the house depending on your plumbing system.
- Once the water is turned off, empty the tank by flushing remaining water and using either a towel or sponge to remove the rest.
- Next, you will need to remove the water supply hose. Remove it from the tank. The line is likely to still have water in it, so be sure to keep a pail on hand in order to avoid unnecessary messes.
- Now you will need to remove the bolts attaching it to the floor. Light to moderate pressure is all that is required to remove the bolts, and they may bend or break if too much is used so be careful with this step. Also, note that If they are corroded, you may want to try applying oil and waiting a few minutes before attempting to loosen.
- Once the bolts are off, you will need a couple 2×4 blocks or bricks to set your toilet o. This will raise the drain and keep it from coming into contact with the floor. If you don’t do this, it may tip over or damage your floor with wax residue. Additionally, when moving your toilet, check that the old wax ring doesn’t stay attached to the bottom of the toilet to avoid problems later.
- Also, get help moving your toilet if you need it. They are heavy and can cause injury if lifted improperly.
Install the New Wax Toilet Ring
- When replacing your old wax ring, always wear disposable gloves. It’s a gross job, don’t skip this part!
- A worn wax ring should be easy enough to move. If it gives you any trouble, grab your putty knife and peel it off. Mineral oil on a rag can wipe off anything that remains on the toilet anchor flange or toilet drain.
- After removing the wax ring, be sure to block your drain with rags to prevent noxious sewer gasses being leaked.
- Next, get the toilet anchor flange freed by removing the current bolts and check to see if the toilet anchor flange is bent or damaged.
- Insert the new mounting bolts into the anchor flange.
- Now press the new wax ring into place around your toilets drain. You will want to press it firmly into place but not hard enough to misshape the ring. Remember to remove the rags blocking the drain before replacing the toilet!
- Next, replace the toilet by placing the toilet drain with newly attached wax ring directly over the floor drain lower it into place. You will be able to see the mounting screws coming through the holes in the base when it is correctly aligned.
- Gently press down and rock the toilet back and forth seal the wax ring.
- Next, reattach the washers, and nuts mounting the toilet in place. Do not tighten too much or it can damage the toilet or flange.
- Finally, reattach the water line to the tank and turn the water back on. Check the base of the toilet in a few hours to make sure the wax ring sealed properly.
Once you have reattached the water line, you will then be able to use your toilet again. As long as you don’t notice any wetness or seeping water beneath your toilet then a few hours after the job is complete, you then know that you have completed the task of replacing a wax ring on your toilet correctly. With a positive, DIY attitude, you can tackle most toilet repair projects!
